An Introduction to the Unix Command Line
Introduction
The original Unix system was developed by Bell Laboratores in the 1970s. It has since become the foundation of many operating systems, including Linux systems and macOS. Luckily for us, while all these operating systems may have very different graphical interfaces (GUIs), they share a common command-line interface (CLI). In this introduction, we will cover some of the most useful tools provided by this interface.
Note
With macOS Catalina, Apple switched the default terminal shell from
bash to zsh. This guide focusses on bash, so you may need to run
bash -s to get a bash shell.
Note
This guide is written for Mac users, but it should largely apply to any Unix system. I try and point out the parts that are Mac-specific.
Motivation
Once upon a time, the Unix command line was the only way to use a develop software. Now, however, there exist a plethora of integrated developer environments (IDEs) and graphical text editors. So why bother learning Unix commands at all? Here are a few of my reasons.
Unix is the Language of Coders
Even if you don’t need to know the command line, you still will have to work with other people who live and breathe it. Take a moment to skim this page from the developer’s guide for installing Oppia on a Mac. It is full of command-line instructions! Even if you can do all your work without the CLI, other people are going to assume you are fluent in Unix.
Knowledge Keeps you Safe
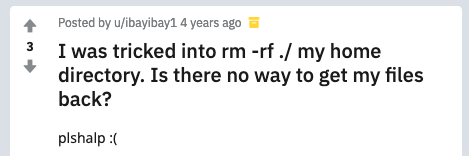
Even if you didn’t understand the terminal commands in the Oppia installation instructions, you could always copy-and-paste them, right? Don’t. Never run commands you don’t understand! Otherwise you might end up like this poor soul who accidentally deleted their home folder:
Warning
rm -rf <some folder> is dangerous! It deletes the specified
folder and all subfolders recursively. It also does so without
asking any questions (because of the -f) regardless of files
that are marked as not to be deleted. The deleted files are not
moved to the trash, they are immediately deleted.
The CLI Helps Diagnose Bugs
I’m going to wax a bit philosophical for a moment, so bear with me. When you are trying to track down a bug, you want to assume that as little code as possible works. For example, if you have a function in a program that is buggy, are you going to debug by running the whole program or just the function? I’d hope you’d (barring unusual cases) choose to run just the function so that you don’t have to worry about bugs elsewhere in your code. The same principle applies here. If you are debugging a problem with some software, you don’t want to have to assume that a full GUI is working properly. Better to go with a command-line tool that has been used by so many programmers, it’s about as bug-free as we are likely to get.
Sometimes graphical programs also hide important details. For example, some programs assume that files end with a newline character. A graphical text editor might not show a file as missing a trailing newline, but the command line will.
Overview
This introduction is centered around a program I wrote. We will work through downloading and using the program, just like you might when installing a project you want to contribute to. Along the way, we’ll use command-line tools, and I’ll explain what they do. By the end, you should:
Be able to navigate, modify, and search the file system.
Be able to use command-line editors to work with text files.
Be comfortable working with text files through the terminal.
Understand how executables work in Unix.
Know how to find more information about Unix commands.
Have a basic understanding of how to work with command outputs.
Let’s get started!
Getting Acquainted with the Unix File System
Moving Around
You are probably familiar with the files and folders of your computer looking something like this:
In the command line, we work with the same files and folders using Unix
commands. Start by opening your terminal. On a Mac, launch the
Terminal application from your applications folder. Then move to
your home folder by running:
$ cd ~
Note that the $ here stands for the command prompt your terminal
shows when it’s awaiting instructions.
The tilde (~) is a short-hand for your home directory, and cd is
a command that moves you to the path you give it as an argument. In this
example ~ is the argument. A neat trick is that running cd
without any arguments is the same as providing the tilde as the
argument.
To see where you are in your file sysstem, you can print your current working directory like this:
$ pwd
/Users/<your_username>
Here, I’ve included a line without the command prompt. This is an example of the kind of output you might see from running the command that immediately precedes it. I will use this notation throughout this guide, and it is commonly used for Unix systems.
Now let’s explore a little. - is a short-hand that tells cd to
return to your previous working directory, and .. refers to your
parent directory. / refers to the root of your file system. On a
Mac, this is usually called Macintosh HD. Here’s how these work:
$ pwd
/Users/<your_username>
$ cd ..
$ pwd
/Users
$ cd /
$ pwd
/
$ cd -
$ pwd
/Users
Note that these paths might be different if you’re not on a Mac.
Now let’s see what this journey looks like in the GUI. Open your home
folder in your computer’s file explorer (e.g. Finder on a Mac). If you
right-click on the folder name in the top middle of the window, you can
see the Users folder we saw from pwd. If you click it, that’s
just like running cd ... If you open Macintosh HD, that’s like
running cd /. If you click the back button, that’s like running
cd - (only the first time! cd doesn’t save history the way the
back button does).
In the GUI, we constantly see the contents of our current directory in the Finder window. In the CLI, we can see the same contents like this:
$ cd ~
$ ls
Desktop  Downloads  ...
The ls command lists the contents of your current directory.
We can see the equivalent GUI display by opening our current directory
in the finder:
$ open .
open is a Mac command that opens files in the appropriate
application, and . is a short-hand for your current directory.
Setting Up the Program
Now let’s setup the program we will work with for the rest of this guide. Start by creating a folder somewhere on your filesystem to store this work. You now know how to move around in the terminal, so put it anywhere you like! Here’s a useful trick: dragging a file or folder onto the Terminal window pastes into your command line the path to that file or folder.
$ cd /your/desired/path
$ mkdir unix_guide
The mkdir command creates a folder in your current directory with
the name you specify. Now, we can download the program:
$ cd unix_guide
$ git clone https://github.com/U8NWXD/unix_intro.git
This isn’t a guide about git, so I’m going to assume you know how it
works. If not, it’s also not that important here. You can also download
the zip file from the
GitHub page.
Quick sidenote here. The tree command is awesome, but it isn’t
installed by default on Macs. You can install it using the also awesome
HomeBrew. If you install it, tree will show a
hierarchy of files from your current directory.
Permissions and File Metadata
Permissions
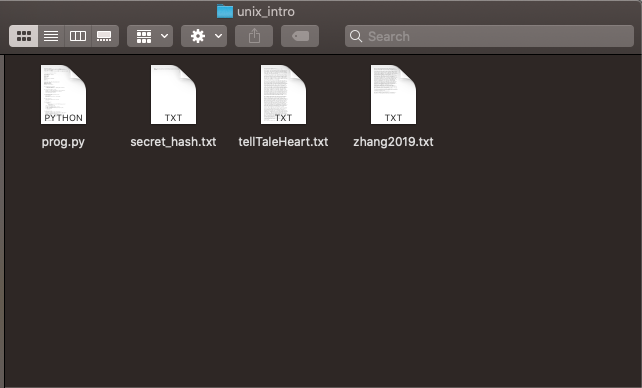
Now that we have downloaded the code, let’s run the program! Enter the folder that git downloaded and show the files present:
$ cd unix_intro
$ ls
prog.py           secret_hash.txt   tellTaleHeart.txt zhang2019.txt
There are a number of files here we won’t use until later, but let’s
start with the program itself, prog.py. To run a program (called an
executable) in Unix, all we have to do is type a path to it. However, to
help us prevent running executables by accident, Unix requires that we
inclue ./ for executables in our current working directory. Recall
that . stands for your current directory. Let’s run the executable
like this:
$ ./prog.py
-bash: ./prog.py: Permission denied
Oops, we get a permission error! Each Unix file has permissions that
specify who can read, edit, and execute it. To see these permissions,
run ls with the -l flag, which tells ls to show additional
information, including permissions, about each file.
$ ls -l
-rw-r--r-- 1 cs  staff   4052 Jan  8 09:26 prog.py
...
The -rw-r--r-- part specifies the file’s permissions. It’s made up
of four parts:
-This specifies the file type, for example whether the file is a directory.
rw-This indicates the permissions of the user that owns the file, which we can see from the output above is me (
cs). You’ll see your username there. Therwmeans we can read and write, but the-means we cannot execute.r--This indicates the permissions assigned to the group that owns the file. They have only read permissions. In my case, the group
staffowns the file, as you can see from the output above.r--This indicates the permissions assigned to all other users. They can only read.
Unix uses octal to abbreviate these permissions. Each of the last
three groups above can be thought of as sets of three bits. In binary,
these bits are (110)(100)(100), where I have used parentheses to
separate the three sets of bits. Recall that to convert binary to octal,
we can take each group of three bits, evaluate each as a decimal number,
and then concatentate the resulting digits. In this case, this procedure
yields the octal number 644, with each digit specifying the user (who
owns the file), group (who owns the file), or world (everyone)
permissions.
With that in mind, what permissions do we want the file to have so that we can execute it?
Click to reveal the answer.
We want permissions 744. We only change the first digit to affect our own permissionsas the owner. We make it a 7, which in binary is 111, to give ourselves full permissions, including execution.
So let’s make our program executable:
$ chmod [octal permissions number] prog.py
substituting in the permissions number you found above. Now if we view
the permissions again, you should see an extra x indicating you have
execution permissions:
$ ls -l
-rwxr--r--  1 cs  staff   4052 Jan  8 09:26 prog.py
Last Modified Time
Now we can run the program! First, let’s use its help feature to see what it can do:
$ ./prog.py -h
usage: prog.py [-h] {edited,diff,pass,hash,secret} ...

A program to help you experiment with some UNIX commands

positional arguments:
  {edited,diff,pass,hash,secret}

optional arguments:
  -h, --help            show this help message and exit
There are a bunch of features here that we’ll get to later, but let’s
start with the edited feature. It can tell us how long ago a file
was modified. Let’s create a file using the touch command and then
see how long ago it was modified:
$ touch foobar
$ ./prog.py edited foobar
0:00:03.692538
This program is part of unix_intro (https://github.com/U8NWXD/unix_intro)
Great! We modified our file (by creating it) about 3 seconds ago. Now let’s try some other ways of editing the file:
Using
touch:touch foobar.With a text editor: Open the vim editor with
vim foobar, then typeito enter insert mode. Make some changes (navigate with arrow keys), and then leave insert mode by pressing escape. Then, save and exit by typing:wq.Renaming it:
mv foobar foowill “move” the filefoobarto the filefoo, which effectively renames it.
Shebangs
But how does the terminal know how to execute the program? It has the
.py extension, but it could still be python 2 or 3. In fact, the
file extension is irrelevant. Instead, the terminal relies on a
shebang, which is a comment at the top of the file. Take a look using
head, which shows the first few lines of a file:
$ head -n 2 prog.py
#!/usr/bin/env python
# This file is part of unix_intro (github.com/U8NWXD/unix_intro),
See that #!/usr/bin/env python? That tells the terminal to use
whatever executable is run when you type python into the terminal.
As a quick aside, head has a complementary command called tail
which does the same thing, only from the end of the file.
Looking Up Commands
We can also see this metadata ourselves. Remember the ls -l command?
We can lookup what the rest of its output means in its manual page:
$ man ls
Look for the -l entry and read where the modification timestamp is
shown.
Note
The man command is invaluable. If you need to figure out what a
command does, it should be your first stop. Online documentation is
great, but sometimes commands have slightly different syntax on
different operating systems. The manual pages from man should
always be accurate.
We can also see where the ls executable is on the system:
$ which ls
/bin/ls
This is super helpful when you want to know which version of a command you are running. For example, try:
$ which python
This will tell you which python installation you are running now. If you haven’t already discovered, there can be many python installations on a single system!
Comparing Files
Let’s move on to another of the program’s features, diff, which
checks whether two files are identical. Let’s try it out by making a
copy of Edgar Allen Poe’s Tell Tale Heart:
$ cp tellTaleHeart.txt copy.txt
As you may have guessed from this example, cp copies the file at the
first argument to the second argument. Now, let’s see if they are the
same:
$ ./prog.py diff tellTaleHeart.txt copy.txt
True
This program is part of unix_intro (https://github.com/U8NWXD/unix_intro)
We get True, indicating that the files are the same, as we’d
expect. Now go ahead and edit copy.txt in vim and try again:
$ ./prog.py diff tellTaleHeart.txt copy.txt
False
This program is part of unix_intro (https://github.com/U8NWXD/unix_intro)
Now they’re different! We can find the difference using diff:
$ diff tellTaleHeart.txt copy.txt
The output identifies the lines that are different between the two
files. If you’ve used git diff before, this is similar.
Environment Variables
Notice the pesky line that the program always prints out telling us it
is part of unix_intro? There is a way to hide it, but instead of
using an argument, it uses another common way to configure Unix
programs: environment variables.
Environment variables are variables accessible to every program running
in your terminal. You can see all your current variables with
printenv:
$ printenv
SHELL=/bin/bash
PWD=<your current directory>
LANG=en_US.UTF-8
OLDPWD=<your previous directory>
...
Notice that OLDPWD shows your previous directory and PWD your
current one. This is how cd - and pwd work!
To disable that annoying line (I’ll call it an epilog), we need to set
an environment variable called UNIX_INTRO_DISABLE_EPILOG to 1 (which
will mean true for Python). Set it like this:
$ export UNIX_INTRO_DISABLE_EPILOG=1
$ ./prog.py diff tellTaleHeart.txt copy.txt
False
See, no epilog!
Let’s say we want to avoid typing that long variable name each time. We
can save it to a file and then load that file instead. To do this, open
a new file in vim called environ:
$ vim environ
and write in it export UNIX_INTRO_DISABLE_EPILOG=1. Now, you can set
the variable just by using the source command, which loads the
contents of a file into your terminal:
$ source environ
Go ahead and try it in a new terminal window!
Handling Large Command Outputs
Our program can also generate passwords by selecting random words (obligatory xkcd reference). Try it out:
$ ./prog.py pass 3
Cainian
urceolate
neighboress
Of course your words will be different (it’s random!). Now let’s make a really strong password:
$ ./prog.py pass 100
teetotalism
semiprimigenous
rhyacolite
...
That’s a lot of output! Let’s use less to make the output scrollable
and avoid cluttering up our terminal history:
$ ./prog.py pass 100 | less
Notice we used a fancy new operator here, the pipe (|) operator. It
takes the output from the left-hand command and sends it (“pipes it”) to
the right-hand command. This is very useful for stringing commands
together.
We can also send our password to a file using >, another cool
operator:
$ ./prog.py pass 100 > password.txt
Go ahead and take a look at password.txt in vim. Now let’s add
another 100 words. If we use > again, we’ll overwrite the file, but
if we use >>, we can append to it:
$ ./prog.py pass 100 >> password.txt
Now that we have a lot of words, we can do some other cool things to
them. First, you need to know that the cat command prints out the
contents of a file. With that, we can sort them:
$ cat password.txt | sort | head
and we can remove any duplicates:
$ cat password.txt | sort | uniq | wc -l
Note
The uniq command cnly compares adjacent lines, so you have to sort the file first!
Here I used the wc command, which counts. With -l, it counts the
number of lines it is provided. Were there any duplicated words?
Deleting Files
Warning
Be careful deleting files from the command line! There’s no trash, so once you run the command, your files are gone.
Remember that story at the top about the poor fellow who erased their
home directory? Now we can learn what that command did. We delete files
using rm. For example, delete the password file:
$ rm password.txt
Now the fellow from earlier ran rm -rf ~. The ~ means the home
directory, but rm won’t delete directories so easily. The -r
flag tells rm to delete the specified folder and any subfolders
recursively, removing the entire file tree. Lastly, there are some files
that are protected from being deleted (git makes a few of these). -f
tells rm to ignore those protections and delete anyway.
Searching
Now maybe you noticed that the program has one other feature, called
secret. Let’s run it:
$ ./prog.py secret
There is a file in /usr/ called 'words'.
Count the words in that file that have the 'not' prefix.
Assume the prefix takes the forms: il-, ir-, im-, in-.
Password:
First off, you for some reason haven’t been returned to the command
prompt! That’s because the program is waiting for you to enter the
password. Since we don’t know it yet, quit the program by holding the
control and c keys together.
Note
Using ctrl-C to kill running programs is very useful when things go wrong. Don’t forget it!
Now, our first task is to find a file in /usr/ called words. If
we look in /usr/, it doesn’t look like words is going to be
easily found:
$ ls /usr
X11        X11R6      bin        lib        libexec    local
sbin       share      standalone
Instead, let’s use the find command:
$ find /usr -name words
find: /usr/sbin/authserver: Permission denied
/usr/share/dict/words
There it is! (We can ignore the permission error.) find is actually
quite powerful, but I’ll let you explore it’s abilities on your own.
Now we need to find all the words starting with im, il, in,
or ir. This is a great job for a regular expression. I’ll leave
explaining the details of regular expressions to
this Digital Ocean post
but I’ll tell you that we want to find all words that match
^i[lmnr]. The ^ represents the start of the word, and [lmnr]
stands for any of the 4 letters. We can use grep to filter out only
the words that match this regular expression:
$ cat /usr/share/dict/words | grep "^i[lmnr]" | wc -l
Once you get an answer, click here to check.
You should get 6999.
Now we can run the program again and enter the password. Notice that when you enter the password, your typing is not shown. This is a security feature.
As a side note, this is also more secure than passwing a password in as an argument, because any other program you’re running and any administrator can see the arguments to any running program.
You should get this secret message.
I really like mspacetime!
That’s an odd message. Let’s see if we can’t find out what it means by
searching for that last unusual word in the unix_intro folder. It
turns out that with the -r flag to search files recursively and the
-i flag to ignore case, we can do this with grep:
$ grep -ri <the unusual word> .
In the results, you should see a bunch of results from
zhang2019.txt. Go ahead and take a look at this file:
$ cat zhang2019.txt | less
Believe it or not, this abstract was published on bioRxiv, which biologists use to share their papers before official publication. That this nonesense got in caused quite a storm among the academic Twitter community! You can see the abstract on bioRxiv here.
Conclusion
I hope you now are more comfortable using the Unix command line and figuring out how to use new commands. If you’re interested in learning more, try looking up these:
Admin Rights:
su,sudoDownloading Files:
curl,wgetArchives:
tar,gzip,unzipProcess Management:
ps,top,kill,killallJobs
String Manipulation:
awk,sedCryptography:
gpgClock:
date
Licensing and Attribution
Copyright (c) 2020 U8N WXD (https://github.com/U8NWXD) <cs.temporary@icloud.com>

This work, including both this document and the source code in the associated GitHub repository, is licensed under a Creative Commons Attribution 4.0 International License.
This work was initially created for a workshop at Stanford Code the Change.